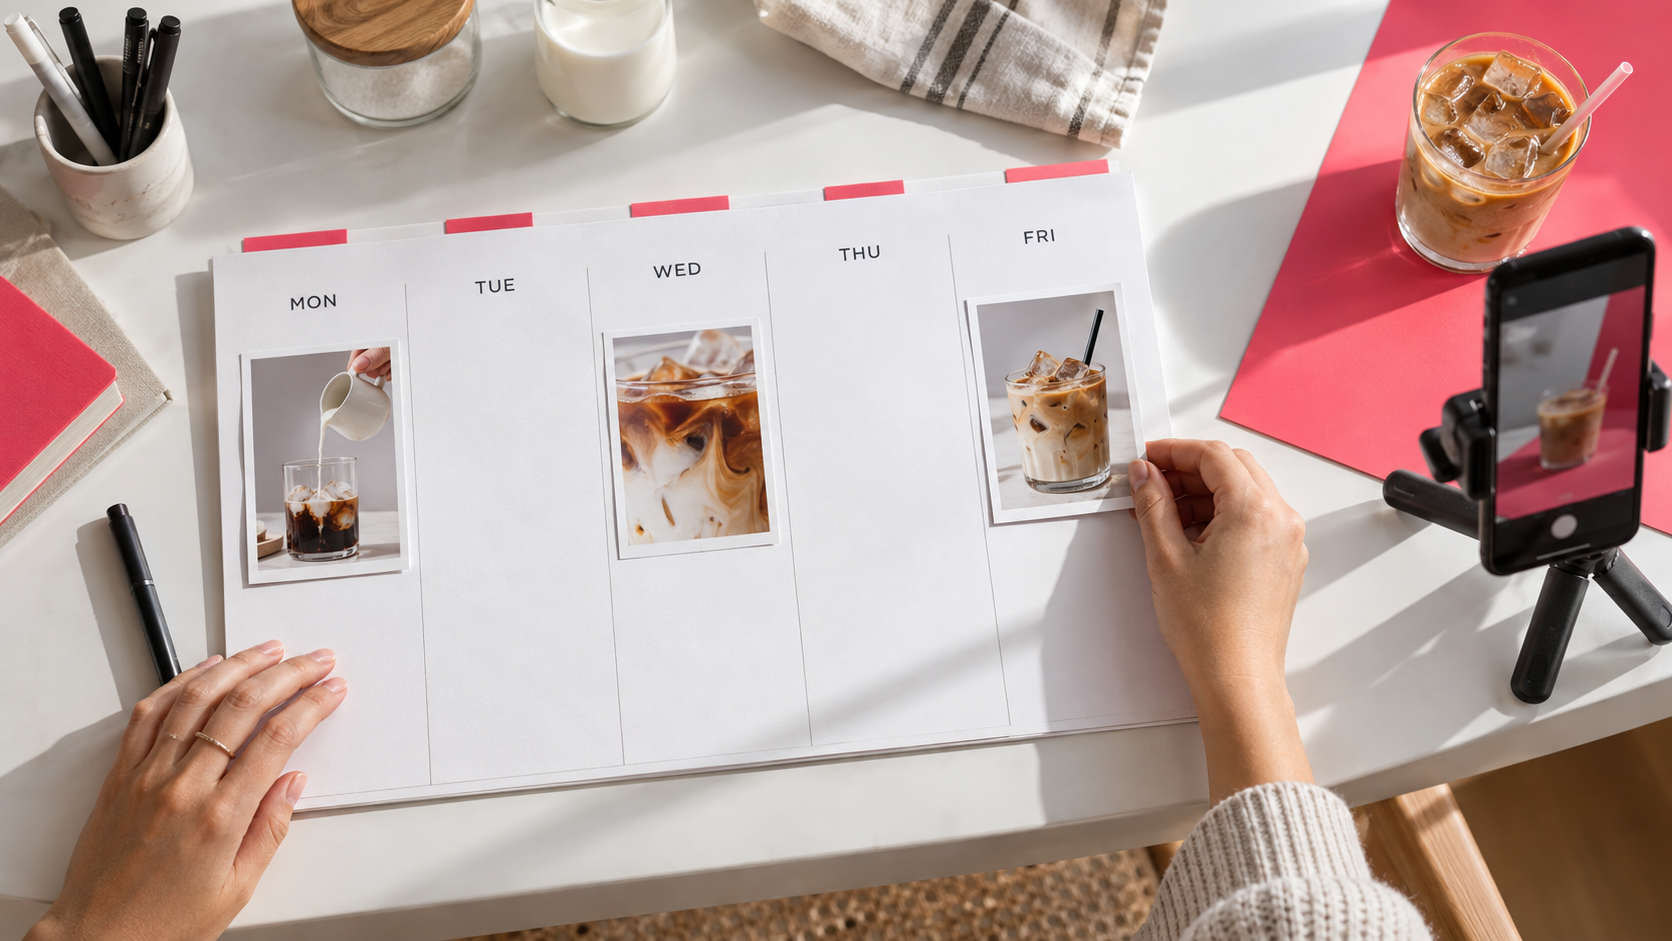
TikTok Content Calendar: Plan Better Videos With Less Rework
Build a TikTok content calendar that makes each shoot count. Get a free template, a 30 day plan, and clear rules for choosing what to film next.
On this page
What should your TikTok content calendar help you decide?
Your best idea can still be the wrong video to make this week.
Use your TikTok content calendar to choose what deserves a slot, what can share a shoot, and what needs to wait.
Make the choices before filming day
When ten ideas compete for one shoot day, choose the work with a clear payoff and time to finish it.
Your calendar keeps the brief, files, deadlines, and next decision together. This guide is for creators who already publish and want more from each shoot.
What You’ll Learn
- Choose the next post: weigh its purpose, proof, and work left.
- Get more from a shoot: give each video its own payoff.
- Catch delays early: allow time for edits and approvals.
- Improve the next batch: turn viewer feedback into a new brief.
How do you use the free TikTok content calendar template?
Use one row per post, with its brief and files on the left and work, results, and next steps on the right. Fill the next week first; keep the rest of the month open to changes.
Open the workbook in Excel or upload it with Google Sheets file import. Use Your posts for your plan and 30-day example as a reference.
The Notes column holds the reason for the post, blockers, and the decision you’ll make at review. Keep those notes short enough to scan before a shoot.
The status dropdowns separate Ready to film, Filmed, Edited, Scheduled, and Published. If your team needs a client review stage, add it with Google Sheets dropdowns.
Which ideas deserve a place in your TikTok content calendar?
Give each candidate a job, a reason to believe it can do that job, and a cost to finish. Choose from that list before adding publish dates.
A useful mix includes posts that repeat a promising approach, posts that test a new choice, and posts tied to a real deadline. There is no fixed ratio that suits every account.
Compare the choices you actually have
Suppose you have three slots and these four ideas. This is a planning example, not measured performance data.
| Candidate | Why it might earn a slot | What to decide |
|---|---|---|
| Followup to a useful comparison | Several viewers asked the same relevant question | Can you show the missing detail with footage you have? |
| Brand launch demo | You have agreed to a fixed date | Are the product, claims, and approval ready? |
| New story format | You want to learn whether this approach fits your audience | Which current format would you compare it with? |
| Trending joke | It’s quick to make, but reaches a broad audience | Does it serve the people you want to keep? |
In this case, you might keep the launch, make the followup, and test the story. The joke can wait unless it has a stronger reason to replace one of them.
A trend earns space by being useful enough to displace something else. Being easy to make doesn’t settle the choice.
Keep the evidence beside the idea: a comment, a repeated question, a past post, or a search finding. TikTok’s Creator Search Insights can reveal searched topics and gaps where the tool is available. Our TikTok keyword research guide covers how to assess those findings.
Use the TikTok target audience guide if two strong ideas would pull the account toward different people.
How much work fits before your next publish date?
Build the schedule around the step with the least spare time. Count the work still needed to finish the posts, including approvals, rather than counting ideas or raw clips.
Say you have six hours for the week. This example budget leaves three hours for editing:
| Work | Time set aside |
|---|---|
| Planning, replies, and review | 90 minutes |
| One shared shoot | 90 minutes |
| Editing and final checks | 180 minutes |
| Total | 360 minutes |
Two regular edits take 60 minutes each. Your new test needs 90. That’s 210 minutes of editing with only 180 available.
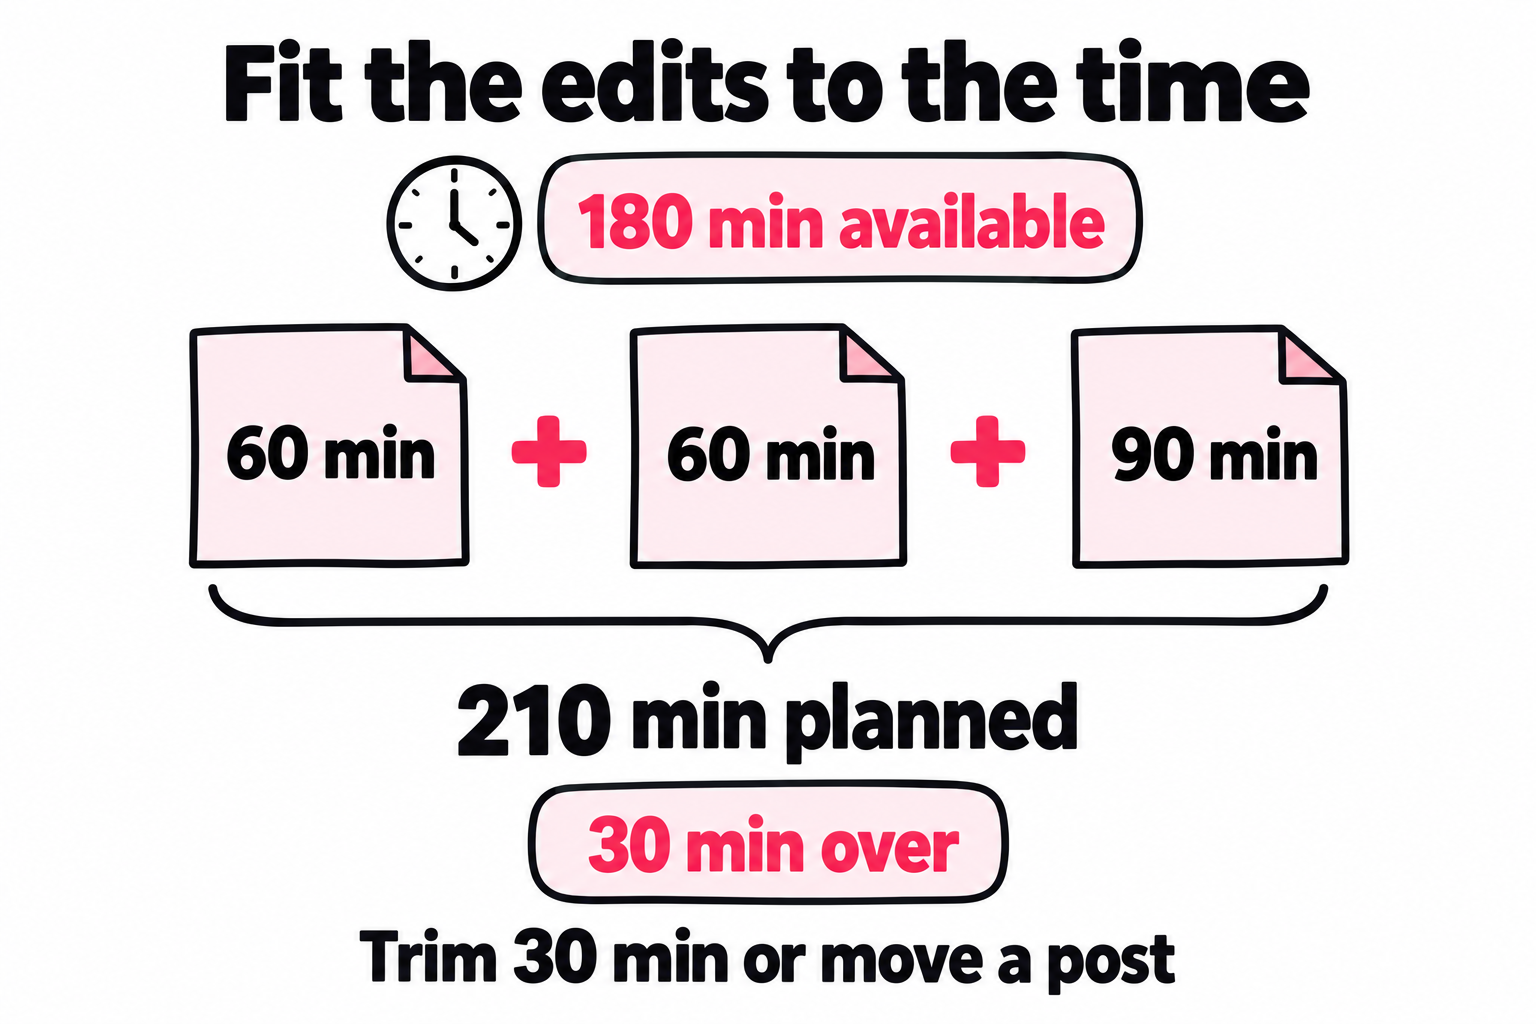
You need to remove 30 minutes of work or move a post. For example, narrow the test to one comparison you can edit in an hour. Keep its main question intact. Cutting the part that answers the question would save time at the expense of the post.
Count the shared shoot once. Then estimate the extra edit, checks, and approval each added video needs. A second cut can be cheap; a new location or guest can make it a separate job.
Find the block before adding more work
Filter your planner by status. If six posts are Filmed and none are Edited, another shoot adds to the wait. Book editing time first.
For each due post, ask: What still has to happen, who can do it, and when can they start? A ten minute approval can delay a finished video for days if the reviewer is away.
In Notes, write “Edit left: 60m | Waiting for: approval | Due: Tue 2pm.” Put the person doing the next task in Owner. Update the time estimate as work gets done so next week’s plan doesn’t count finished work again.
Set an approval cutoff before publish day. For a flexible slot, use a ready backup or move the post. For a fixed launch, flag the blocked step early so the team can agree on a plan. Use the posting frequency guide to test how many uploads are worth making.
How do you get distinct posts from one shoot?
Plan separate viewer questions before you film, then capture the proof each answer needs. Shared footage saves work when each finished post still has its own payoff.
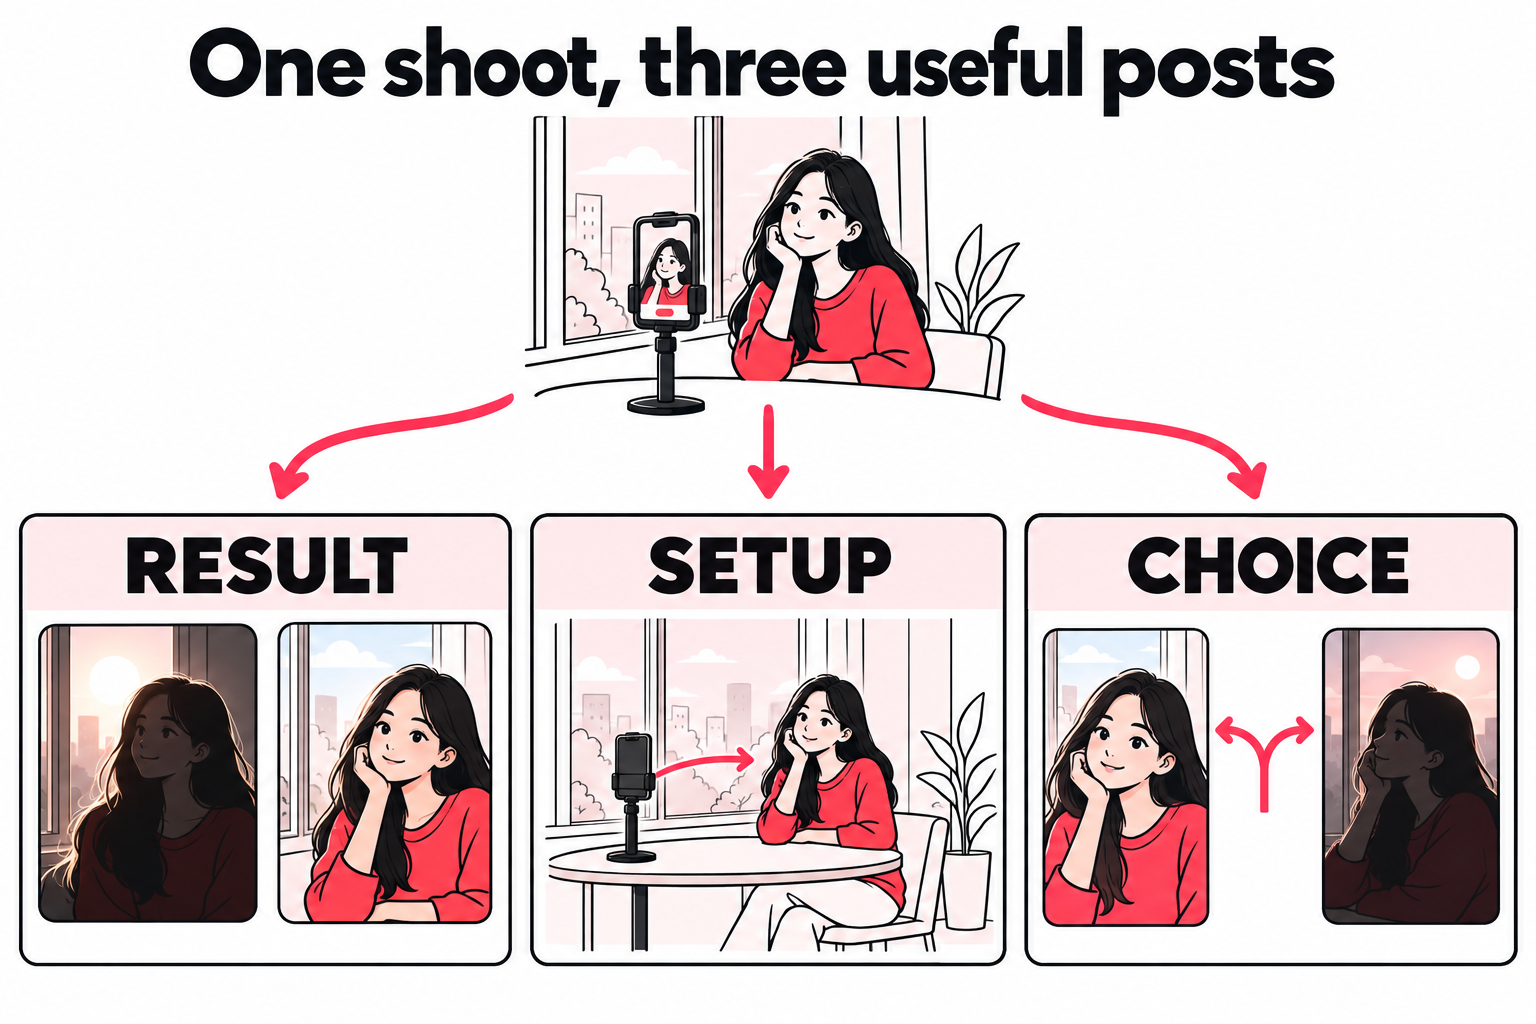
For a phone photography creator, one window light setup could supply:
| Post’s job | Question it answers | Extra footage to capture |
|---|---|---|
| Show a result | What can window light change? | The same subject facing the window and backlit |
| Teach the setup | Where should I put the phone and subject? | A wide view that shows their positions |
| Help someone choose | When would I use each look? | Matched portraits with a reason to choose each |
Those are three reasons to watch. Three new opening lines over the same lesson are variations of one idea. They may be worth testing, but don’t assume each deserves a slot in the same week’s plan.
Capture the hard to repeat shots first. A guest, product sample, or patch of daylight may be gone tomorrow. Record spare close shots while the setup is in place, then leave room to add a fresh reply later.
Keep raw clips and finished files outside TikTok as well. Its draft storage guidance notes that drafts may be lost after reinstalling the app or changing devices.
What should you settle before a post is ready to film?
Set the question, proof, and main creative choice before the shoot. Record anything that could block the post or make it stale while it waits.
Use the Question, Hook, and Shot list columns for the video itself. Add a short note like this in Notes:
Reason: Viewers asked where the phone sits in the window demo.
Proof: Wide setup shot, then the photo taken from that position.
Work left: 60m edit; Mia's approval due Tuesday at 2pm.
Review: Day seven, beside similar short lessons.
Next choice: Add the next step, explain this step better, or move on.
This is a sample brief, not a record of a real account’s results. Replace the reason with evidence you actually have.
Name the choice you’re testing. A new opening on a familiar lesson teaches you something different from changing the whole topic and style. Keep that distinction in the review note.
Approve the question and proof before spending time on the final edit.For client work, separate approval of the idea from approval of the finished file. Ask for a clear choice at each step. “Does this show the product benefit we agreed on?” is easier to resolve before filming than after three rounds of edits.
What does a flexible 30 day TikTok content plan look like?
Reserve fixed dates early, make next week’s briefs firm, and keep later topics open to change. A planned deadline can be fixed even while work is unfinished; Scheduled means the post is approved and queued.
This sample uses three planned posts a week. The workbook includes all 30 days, including production and review tasks. Start on any date; that’s day one.
| Days | Planned posts for a phone photography creator | What to check before the next week |
|---|---|---|
| 3, 5, 7 | Window light portrait; cheaper setup comparison; stable phone support | Which setup needs a closer explanation? |
| 10, 12, 14 | Move one step; one mug with three backgrounds; fix a yellow looking wall | Which change can viewers explain or try themselves? |
| 17, 19, 21 | Two crops of one photo; cloudy day product shoot; original photo through final edit | Where do viewers need another step? |
| 24, 26, 28 | Shutter tap versus timer; three useful steps to try; what you would reshoot | Which lesson deserves another post next month? |
These are starting briefs. If week one raises a useful question about phone position, replace a later planned lesson with that answer. You haven’t failed to follow the calendar. You’ve used it to choose better work.
Reserve the work days too
Plan and review on days 1, 8, 15, and 22. Film on days 2, 9, 16, and 23, and finish the first post during that session. Edit the other two on days 4, 11, 18, and 25.
Leave days 6, 13, 20, and 27 open for a timely reply, trend, or no upload. An open publish slot does not create extra edit time. Any added post still needs to fit the week’s work budget.
Use days 29 and 30 to review the month and set the next briefs. Compare posts only once they have reached your chosen review age; the final uploads may need their results checked next month.
Record each result on its own review date, then use those notes at the next planning session. A day three upload reaches seven days old on day ten. You can review it then and bring the finding to day 15’s planning session.
When should a trend or late request replace a planned post?
Make the swap when the new post is worth more to your goal than the work it displaces. Check both its deadline and the work it adds before saying yes.
Ask four things:
- Who needs this now? Name the viewer and the reason it matters today.
- When does it stop being useful? A sale deadline is firm; a trend needs another check near posting.
- What will it push back? Include edits, replies, and approvals, not just the upload.
- Can you show something worth watching in time? A rushed copy may add little.
A post can be nearly finished and still be worth dropping if its reason to exist has passed. Keep the useful footage. Don’t spend another hour polishing yesterday’s announcement just because you’ve already spent two on it.
Move a lasting tutorial to a free slot. Drop an expired offer. For a post blocked by one missing shot, book that shot and give it a new deadline. “Overdue” should lead to a choice, not sit on the calendar forever.
What needs checking before a scheduled TikTok goes live?
Review anything that can change between filming and posting: dates, prices, links, audio rights, and the reason the post is timely. Confirm the final file and scheduled time before marking it Scheduled.
TikTok’s creator tools support scheduling and content management. Features differ by account, region, app, and website, so check the options available for your post type.
Keep publishing checks separate from reach checks. TikTok’s recommendation guide describes viewer actions, content details, and user information. A low view count alone won’t tell you whether the scheduler caused it.
Use a final check that matches the risks in the post:
- Teaching or comparing: does the footage support the opening claim?
- Selling or announcing: are the details still correct on publish day?
- Using captions: are names, prices, and key steps correct and readable?
- Using music: is the audio cleared for this use?
- Posting for someone else: has the right person approved this exact file?
For posts that promote a brand, product, or service, TikTok recommends its Commercial Music Library. Check its commercial music guidance before using other music.
For manual uploads, name who will post and set a reminder. After release, add the live URL to Notes while keeping the draft file link for future edits.
How should results change next week’s calendar?
End the review with a change to a slot, brief, or time budget. Record the finding and the next decision together so you can see whether you’re acting on what you learn.
Set a review age before posting, such as seven days, and compare similar posts at that age. Use the TikTok analytics guide for the metric checks. In this calendar, the question is what to make next.
| Finding | Change to the calendar |
|---|---|
| Viewers want the next step after trying your lesson | Replace a broad recap with that next step |
| Viewers couldn’t follow the step you showed | Fix the missing detail before expanding the series |
| A new format brings relevant interest but takes too long | Keep the question; plan a simpler version with an edit time limit |
| A high view post draws people who want a different topic | Hold off on expanding it until you check whether those viewers fit your goal |
| One post does well and similar posts don’t | Keep one slot for another test before giving it a whole series |
| A reply post does well | Test another useful question before assuming every reply will work |
Keep the claim small enough for the evidence. A successful post can justify another attempt without proving you’ve found a reliable format.
Set the review rule before you see the result
For a setup tutorial, the rule might be: “Give this one more slot if viewers want the next step and we can make it within our edit budget.”
Read the questions before deciding. “How would I do this outside?” suggests another lesson. “Where did you put the phone?” may mean the first video skipped a key shot. One calls for a followup; the other calls for a clearer explanation.
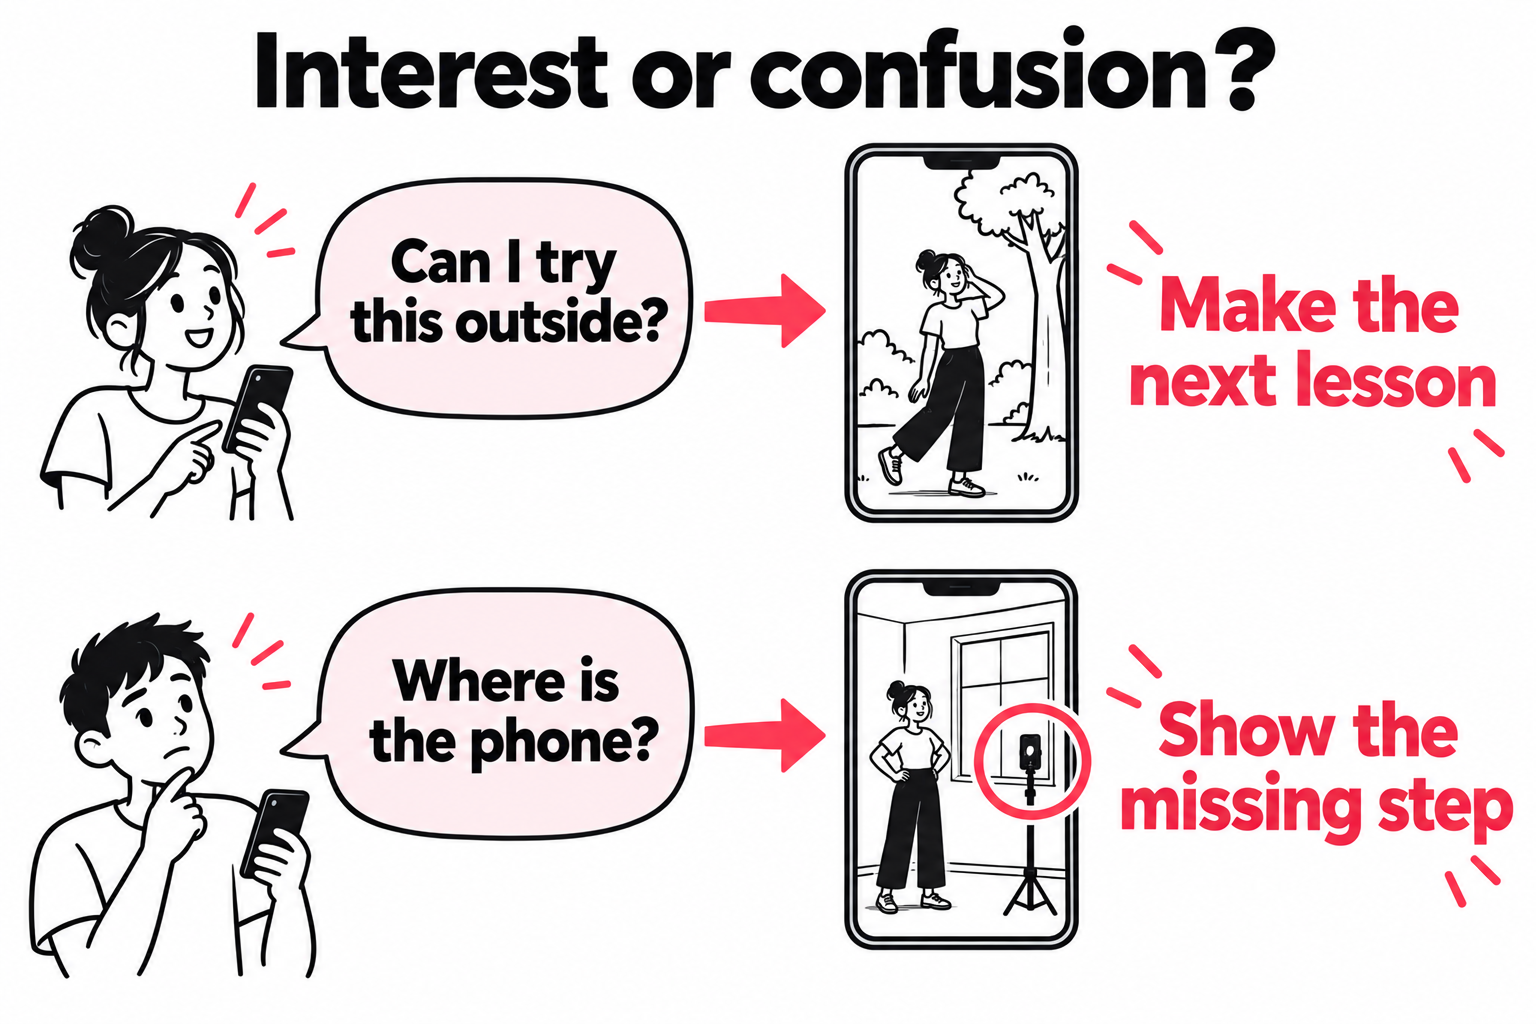
Write the next action with a date: “Replace Friday’s recap with a close view of the phone position. Film it Tuesday.” That is more useful than “make more educational content.”
What should your calendar do after you hit Publish?
Give each finished video a route to the people it was made for, and assign the task of getting it there. Keep the live post, any launch costs, and the response in the same row so you can judge the whole effort.
Give useful work another way to be found
Your window light lesson could help someone who hasn’t searched for it or seen your account. A share from a relevant creator, a link in your own newsletter, or paid placements can give that person a way to find the video.
Keep the path specific: show the useful moment, then send the viewer to that exact post. A preview of the portrait comparison should open the comparison, rather than leave someone searching your profile for it.
For paid reach, one route is a video preview in mobile apps or on websites, with a tap leading to the original TikTok. You’re giving the finished video another source of viewers. You don’t have to create a separate content schedule for each place the preview appears.
Before adding more shoots, check whether the videos you’ve finished have a planned route like this. A good answer may be worth sharing again with a relevant audience while you work on the next one.
Set the launch rules while you plan the series
Decide which posts get support and how it starts before they go live. This saves you from rebuilding the plan for each upload or making every choice in response to its first few views.
Use the Distribution and Notes columns to record a small set of rules:
| Launch choice | What to settle before publishing |
|---|---|
| Which posts qualify | For example, complete tutorials for the same audience; leave out personal updates or expired offers |
| What starts the work | The post is public, its link works, and any required approval is complete |
| Where viewers land | The exact TikTok shown in the preview |
| What can be spent | A cap per video and a limit for the full batch |
| What gets recorded | Start time, spend, delivered traffic, and the post’s response at your review date |
You can run this from the planner yourself. Count the setup and followup time in your week, just as you count editing. If those tasks repeat across every upload, they’re also clear work to hand off.
For a regular series, automatic campaigns tied to each new public video can carry out those rules: detect the upload, start its campaign after approval, and keep a report for that post. Keep control of which videos qualify, what each can spend, and when to skip one.
The useful saving is having fewer launch tasks to remember every time you post. You still choose the content and judge the response. A report beside each video lets you check whether that extra reach was worth repeating.
Keep the source of the result visible
If you’re testing organic performance, leave the post unpromoted through your chosen review window. If support starts earlier, log it and compare posts with similar support. The campaign report shows what was delivered; the video’s results show how people responded. One does not prove the cause of the other.
Before closing the calendar, each selected post should have a filming brief, a launch task or standing rule, and a review date. That gives the work a full path from the first shot to a decision about what to make next.
Frequently asked questions
How do I create a TikTok content calendar?
Start with fixed deadlines, then choose the posts you have time to finish.
Give each video a row with its question, opening, shots, files, owner, and publish date. Include the filming and edit time it still needs.
Outline the month, finish next week's briefs, and set review dates. Keep later slots open for useful viewer questions.
Is there a free TikTok content calendar template?
Yes. The free planner works in Excel and can be imported into Google Sheets.
It includes 30 blank rows and a filled month with 12 posts, plus filming, editing, and review days. No email signup is needed to download it.
The planner tracks your work. Use a scheduling tool to publish the posts.
Can you schedule TikTok posts in advance?
Yes. TikTok Studio can schedule supported posts in advance.
Upload the finished video, check its details, and choose a date from the schedule options available to your account. Confirm it was saved before marking the row Scheduled.
Your calendar can cover a full month even if your tool only lets you queue part of it.
Why can't I schedule posts on TikTok?
Scheduling options can differ by account, region, post type, and app or website.
Check TikTok Studio on the web as well as the app. Note whether the option is missing or the upload returns an error.
If it still fails, report the exact error and assign a manual upload. Keep the file and planned time in your calendar; mark it Edited until it's queued or published.
Do scheduled TikTok posts get fewer views?
Lower views after scheduling do not prove that the scheduler caused the drop.
TikTok's public recommendation guide describes several factors in reach. It does not establish a blanket penalty for scheduled posts.
Check that the video went live with the right visibility and look for review notices. Compare similar posts at the same age, noting changes in topic, timing, and paid support.